
Can Your Network Policies Withstand Chaos?
How to use Chaos engineering to test your CiliumNetworkPolicy

[Insert obligatory excuses here for my delayed writing—though honestly, I’ve been immersed in drawing (too much) and diving into product management all this time!]
I don’t have a perfect reason for writing this particular piece, but here’s the truth: I’ve been putting in a lot of work on my demo environment lately, and something kept bugging me. I needed an environment that felt genuinely dynamic—an ecosystem where traffic would sometimes get dropped for unpredictable reasons. I wanted something realistic enough to easily showcase Hubble and Cilium’s impressive capabilities. So, I searched for tools that could create varied, unpredictable scenarios on the fly, and that’s when I discovered LitmusChaos.
Today, we’re diving into chaos engineering to see how it can help you build a resilient set of network policies (or, at the very least, an improved demo environment).
The basics of chaos engineering
Everything is in the name, but let’s take a closer look!
Chaos engineering emerged in the early 2010s when Netflix engineers faced challenges moving their complex systems to the cloud. They encountered unpredictable failures that could disrupt the system, and their main goal was to ensure Netflix remained resilient despite these inevitable cloud infrastructure failures.
The Origin Story: Netflix and Chaos Monkey
The earliest and best-known tool for embodying chaos engineering is Chaos Monkey, which Netflix developed in 2011. The concept was radical but simple: on purpose, disrupt or terminate services in Netflix’s production environment and see how the system responded. Chaos Monkey would randomly kill instances, triggering failures that Netflix engineers would monitor to see how well the system coped. It was a critical way to find weaknesses and verify that redundancy and failover mechanisms worked as planned.
The Netflix team soon expanded Chaos Monkey into the Simian Army—a suite of tools designed to introduce all sorts of failures, like network latency, degraded performance, and even whole-region outages. These tools helped Netflix prepare for real-world incidents, from server crashes to network disruptions, ensuring their systems could keep running no matter what.
Since then, they have provided multiple tools on GitHub, the most famous of which is Swabbie.
Use the same tools to test your CNP.
If you’re running a complex environment and want to be confident that it won’t crumble at the first sign of trouble, chaos engineering is your friend. By intentionally causing disruptions, you can uncover weak spots in your setup and ensure your system can bounce back when things go wrong. And when it comes to securing your network, chaos engineering is the perfect way to test Cilium Network Policies. You will see if they hold up under unexpected scenarios—because it’s better to find out now than in the middle of an actual incident.
Let’s get our fingers dirty… I mean, let’s code stuff
Now, let’s look at chaos engineering in the context of Cilium.
I will introduce one easy example today, but I hope you understand the long list of automation you can introduce to secure your environment. If you want more, just let me know via DM or comments, and I will share more.
Cluster Setup
For this example, I am using two BYOCNI AKS clusters with Isovalent enterprise for Cilium. But here, we won’t be using Cluster mesh or any enterprise feature so that you can follow the setup with Cilium OSS.
Once you get Cilium up and running, we must deploy an application! Today, I will use the Star Wars demo, which deploys two simple apps in a namespace. Go ahead and apply all these cute deployments.
The next step concerns Network policies. By default, Cilium will allow any traffic, but when a CNP is deployed, only traffic matching our CNPs will be allowed.
First, we allow DNS Traffic:

Then, traffic from Tiefighter to Deathstar egresses and ingresses. Plus, there is some extra for the firefighter to cover everything.


If you check your Hubble UI, you should now have something like this:

Our cluster is ready for playtime!
Chaos configuration
Using Litmus in his minimal form is pretty straightforward. Still, I would recommend checking the Architecture page.
For this demo, I will only install the Execution plane. This plane contains the component that runs the Experiments but not the UI part.
helm repo add litmuschaos https://litmuschaos.github.io/litmus-helm/
helm repo updatehelm install litmus litmuschaos/litmus-core --namespace litmus --create-namespace
Next, we need to determine what our chaos test will be doing. The thing I need the most is to generate dropped traffic. To do so, I have two choices: I could either start a random pod that tries to curl a service without the right CNP or change a pod label so it doesn’t match existing CNPs. I went for the second option because my clusters are small, and I don’t want to generate additional load if I can avoid auto-scaling.
I will need the Chaos Runner and the Experiment Jobs for that experiment to access the kube-API server. If you are new to Litmus and haven’t checked the documentation yet, you will need to define multiple resources when you want a chaos experiment to happen. Then, additional resources will be started for you:
- Experiment: It is the test or change you want to make
- Engine: It configures your test and links it to the target resources
- Runner: Will be started by the engine and start the different jobs
- Job: The actual pod making the changes happen
To access the kube-API, I must create a ServiceAccount with the proper access.


I use cluster-admin because I am in a demo environment, but you will have to go with more restrictions in production.
We can then work on defining our Experiment. Litmus comes with existing Experiments and Engines, but I couldn’t find any that help change labels, so as a bonus, you will see how I create custom ones.
I start by writing a script that updates the pod label and then waits before updating it to its original state. The script is stored in a configMap that I will attach to the experiment.
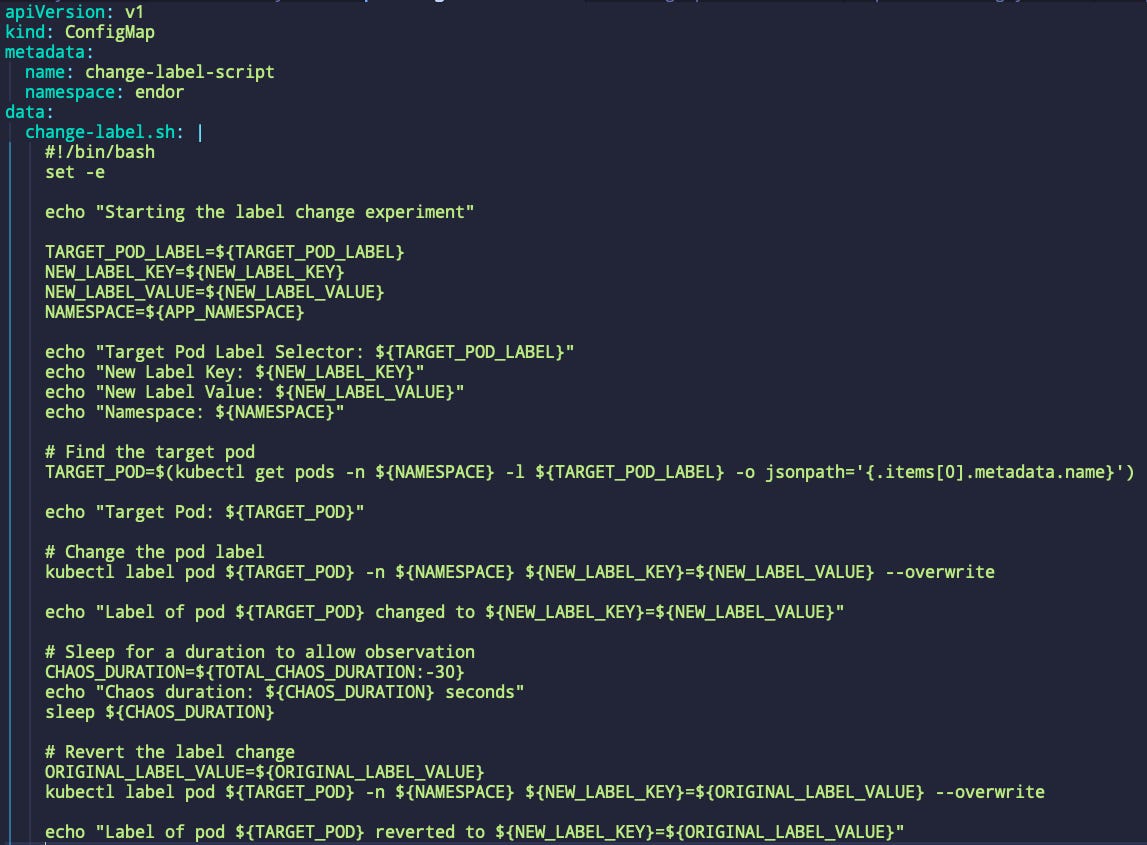
As you can see, I am using a few parameters we will set using the Experiment definition. We will also mount that configMap.

That experiment is pretty simple. I am using a bash command to execute the script we wrote and inject the parameters I will now receive from the Engine. The last step is to write the Engine!

And voila! That Engine is configured with the pod label I want to target, the new labels, and a timer.
Before you try to start everything, I will help you solve incoming issues. As I told you, this engine will start the Runner, which will start the jobs. We gave them the proper access to the kube-API, but we haven’t yet written a CNP for that communication to work! Yeah, it failed the first time for me because of this. So here are the CNPs:
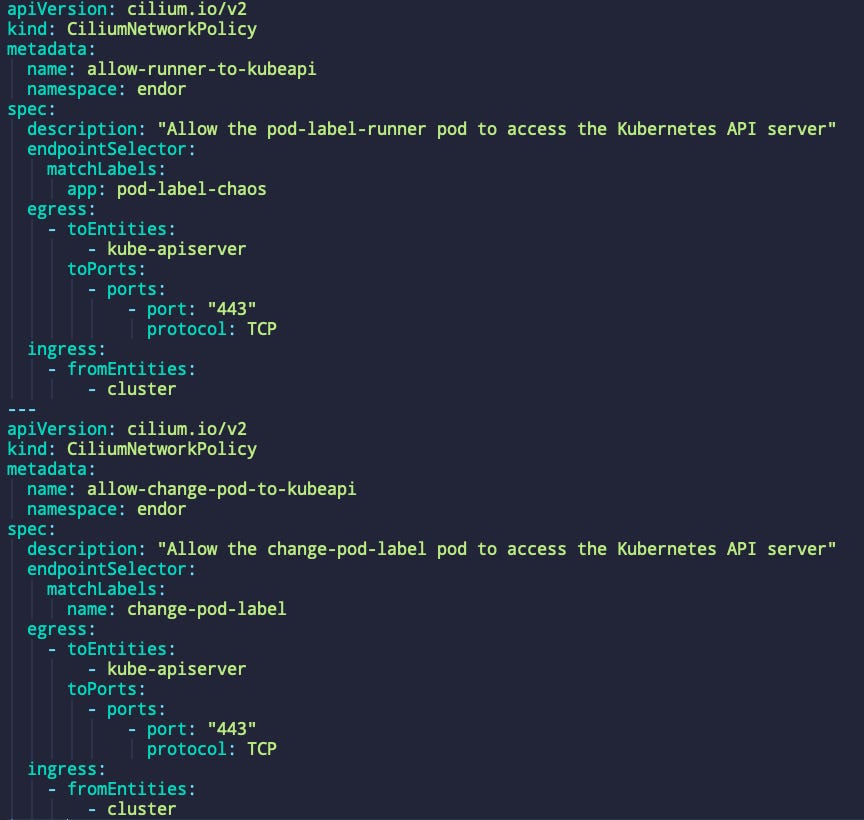
We are now ready to go! Be careful to apply everything in the correct order. This is how I do it: First, I apply the CNP, then SA and RoleBinding, ConfigMap, and finally, Experiment and Engine.
I suggest sitting on your Hubble UI and seeing what happens next!


I am now reaching the email size limit, but as you can see, the traffic dropped after the label was changed and forwarded again after the update!
This is just one example of using Chaos to test CNP, but I have many other ideas! And not only for CNPs, you could cover any network features. You could test your Egress Gateway, the loss of a Cilium agent, or the surge of an entire node.
If you appreciate reading this, forward that email to one person or comment on Linkedin! That is helping me a lot!