


Poking Around with Neuvector
Is this the right tool for your cluster security?

Some people are really good at focusing on just one thing. Their minds stay locked on that one task without wandering. I'm different. Not many people know this, but I have to listen to music during meetings to focus on what's being said (listening to Radiohead as we speak). The music is always there, even when presenting, explaining complex topics, or solving a technical problem.
This is where our story begins.
On a Thursday afternoon, with the soft hum of music in my ears, I was half-listening to a meeting about a new project. Then, a small notification popped up on my computer screen. Without thinking much, I glanced at it. It was a message from our main Sales Engineer channel. I quickly moved my finger across the smooth surface of my trackpad and clicked. The message was simple: "Do we have a feature comparison for NeuVector?" Suddenly, the music in my ears seemed to fade away. My mind was now fully captured by this new challenge.
Just as I was lost in thought, someone in the meeting asked, "Stephane, what do you think?" I quickly realized I had lost track of the conversation. Embarrassed, I invited them to repeat the question. This is a classic example of why you shouldn't lose focus!
As I returned to the meeting, part of my mind was already planning. I knew I wanted to share this experience with you and discuss how I learned about new tools. Everyone has their way—some start with reading the documentation, and some dive straight into using the tool. As for me, I like to begin with watching YouTube videos for hours while walking on a treadmill. Then, I read the documentation, try out the tool, look at the code, see if I can break it, talk to people about it, and then write it all down for you.
I hope you enjoy this Kubestory. As always, sharing is caring, folks!
Never enough video on Youtube
YouTube is my treasure trove, a limitless web of information and entertainment. From endless playlists that keep me company throughout the day to tutorials on various topics - writing, technical subjects, poker, and video games - it's hard to quantify just how much time I spend there. But, the moments I truly cherish are when I dive into learning something new.
It was around 5 pm, a calm evening with no more meetings on the horizon. I had just returned from a work trip to Copenhagen and Zurich. Despite the lingering fatigue, my interactions with the team had left me energized and ready to delve into something fresh.
Settled comfortably on my sofa, with a perfect cup of tea by my side, headphones snugly in place, and an iPad at the ready for notes, I turned to YouTube. "NeuVector demo," I typed.
The first step is to gauge the variety of videos available. When a product is in its infancy, often used by only a few, you'll mostly find footage from events like KubeCon, KCD, or local meetups. As it gains traction in the market, you start seeing presentations from the architects, CxOs, and customers. Finally, hundreds of tutorials and tech influencer videos flood in in its maturity. NeuVector was in the second stage - known enough for a presentation from SUSE to be available online but not yet at the stage where community deep dives spanned hours.
So, I embarked on a marathon of watching. My goal is to grasp the features, understand the architecture, and, most importantly, comprehend how the tool positions itself in the market. Videos are invaluable for this. They offer a real-world application of functionalities, making it easier to understand the purpose and potential of a tool.
Another reason I favor live-recorded presentations is their potential to reveal unofficial yet insightful information. When speaking spontaneously, it's challenging to filter every word, and if you search thoroughly, you can often catch architects divulging exciting secrets.
And speaking of secrets, one aspect intrigued me as I watched these videos. No one mentioned the underlying technology powering NeuVector's functionalities. Presentations from SUSE discussed the architecture, yet the specifics of the technology remained elusive. The phrase I kept hearing was "patented technology." Intriguing, right? We'll delve into that mystery later.
Armed with this new understanding, gleaned from hours of absorbing content, I was ready to advance to the next phase of my exploration: diving into the documentation.
Neuvector Documentation, a Hard Start
Documentation is a double-edged sword in the realm of open-source products. Let me preface this by saying that my intention is not to criticize anyone's hard work but to share my personal experience navigating through it.
My process for dissecting documentation, especially after a deep dive into related videos, typically involves my trusty iPad and a methodical screenshotting ritual. Skimming through the first pages—usually overviews and installation instructions—I capture snapshots of crucial information. Later, I return to these screenshots, embellishing them with annotations, color-coded for quick reference. For instance, anything Azure-related gets a specific hue since I’m running my demo on AKS.
This time around, with NeuVector's documentation, this process was unprecedentedly quick. The overview page provided just that—a very high-level view of its components. It mentioned a few daemon sets and pods for policy enforcement, UI access, and acting as a buffer for the control plane API. But details? Those were scarce.
Take, for example, the description of the 'Enforcer' – a pivotal element of NeuVector. The documentation simply states, "The Enforcer is a lightweight container that enforces the security policies. One enforcer should be deployed on each node (host), e.g., as a Daemon set." And that's it. No insights into its implementation of policies, interactions with other Linux components, nothing. The only additional detail I found was its CPU and memory requirements.
Feeling somewhat adrift in this sea of vagueness, I even reached out on LinkedIn for help, hoping to find someone who could shed light on how the enforcer operates. And I find comfort in the answers of the great Cyril Cuvier that I will use later in the article. Thank you again, Cyril!
So, I pivoted to the installation instructions. NeuVector offers three installation methods: the manual 'Kubernetes' method, Helm, and OpenShift. Being familiar with Helm and Terraform, I opted for the Helm installation. At first glance, it seemed straightforward – just a helm install from their repository. However, the simplicity was deceptive.
Upon closer inspection, I noticed a glaring omission: there were no platform-specific instructions. Delving into the helm values, I stumbled upon variables like "azure.enabled." This raised questions – is this necessary for an Azure setup? The most challenging part was the undocumented docker-engine issue. It took me a solid hour of online searching to find a tutorial that mentioned a specific helm value for containerd: "containerd.enabled." From what I understand, this workaround might not be needed in future releases.
After several attempts, here's the command I ended up with for the installation on AKS:
helm install neuvector --namespace neuvector --version 2.6.6 --set tag=5.2.4 --set registry=docker.io --set azure.enabled=true --set containerd.enabled=true --create-namespace neuvector/core
As you can probably tell, my initial foray into NeuVector's documentation was frustrating. I was on the verge of giving up. But, as they say, perseverance pays off. The journey improved significantly from here. Trust me, the best parts are yet to come.
Neuvector Documentation, A Turn for the Better
The journey with NeuVector, much like any good story, has its ups and downs. Thankfully, what followed was a chapter filled with more hope and clarity. With NeuVector now up and running on my cluster, I eagerly turned to the rest of the documentation, curious about what the tool could actually do. I'm glad to report that this part was a significantly smoother experience, especially for someone keen to grasp the capabilities of the features.
Take, for instance, the Security Policy feature. Diving into this section, I was greeted with a well-organized subdivision of various aspects of the security policy engine. It was a breath of fresh air. Let's focus on "Modes: Discover, Monitor, Protect." This section exemplified what I appreciate in the documentation: concise explanations and visual depictions of the modes. It was straightforward and effective.
Again, I'll refrain from dwelling on the lack of detailed 'how-tos,' but it was more than sufficient for anyone just looking to get a handle on the features. A surprising aspect, at least for me, was the heavy reliance on the UI in most feature-related documentation. For a tool designed for Kubernetes and policy enforcement, this UI-centric approach was a first for me.
This leads to an interesting revelation about NeuVector. The documentation hints that the product is geared towards a specific audience. In my opinion, it's either aimed at professionals with a network background who prefer not to tangle with Kubernetes resources directly or at non-technical users who lean towards 'click ops' – operating mainly through a graphical interface.
After thoroughly perusing the documentation, you get a solid sense of what NeuVector is capable of, even if the intricacies of its workings remain somewhat opaque. And now, my dear reader, the time has come to roll up our sleeves and dive in. Let's get our hands dirty and see what NeuVector truly offers.
It is playtime, and you made it this far!
Let’s start with the UI #TheManager
Now that the groundwork is laid with a thorough read of the documentation and NeuVector up and running on my cluster, it's time to dive into the UI.
kubectl port-forward -n neuvector service/neuvector-service-webui 8443

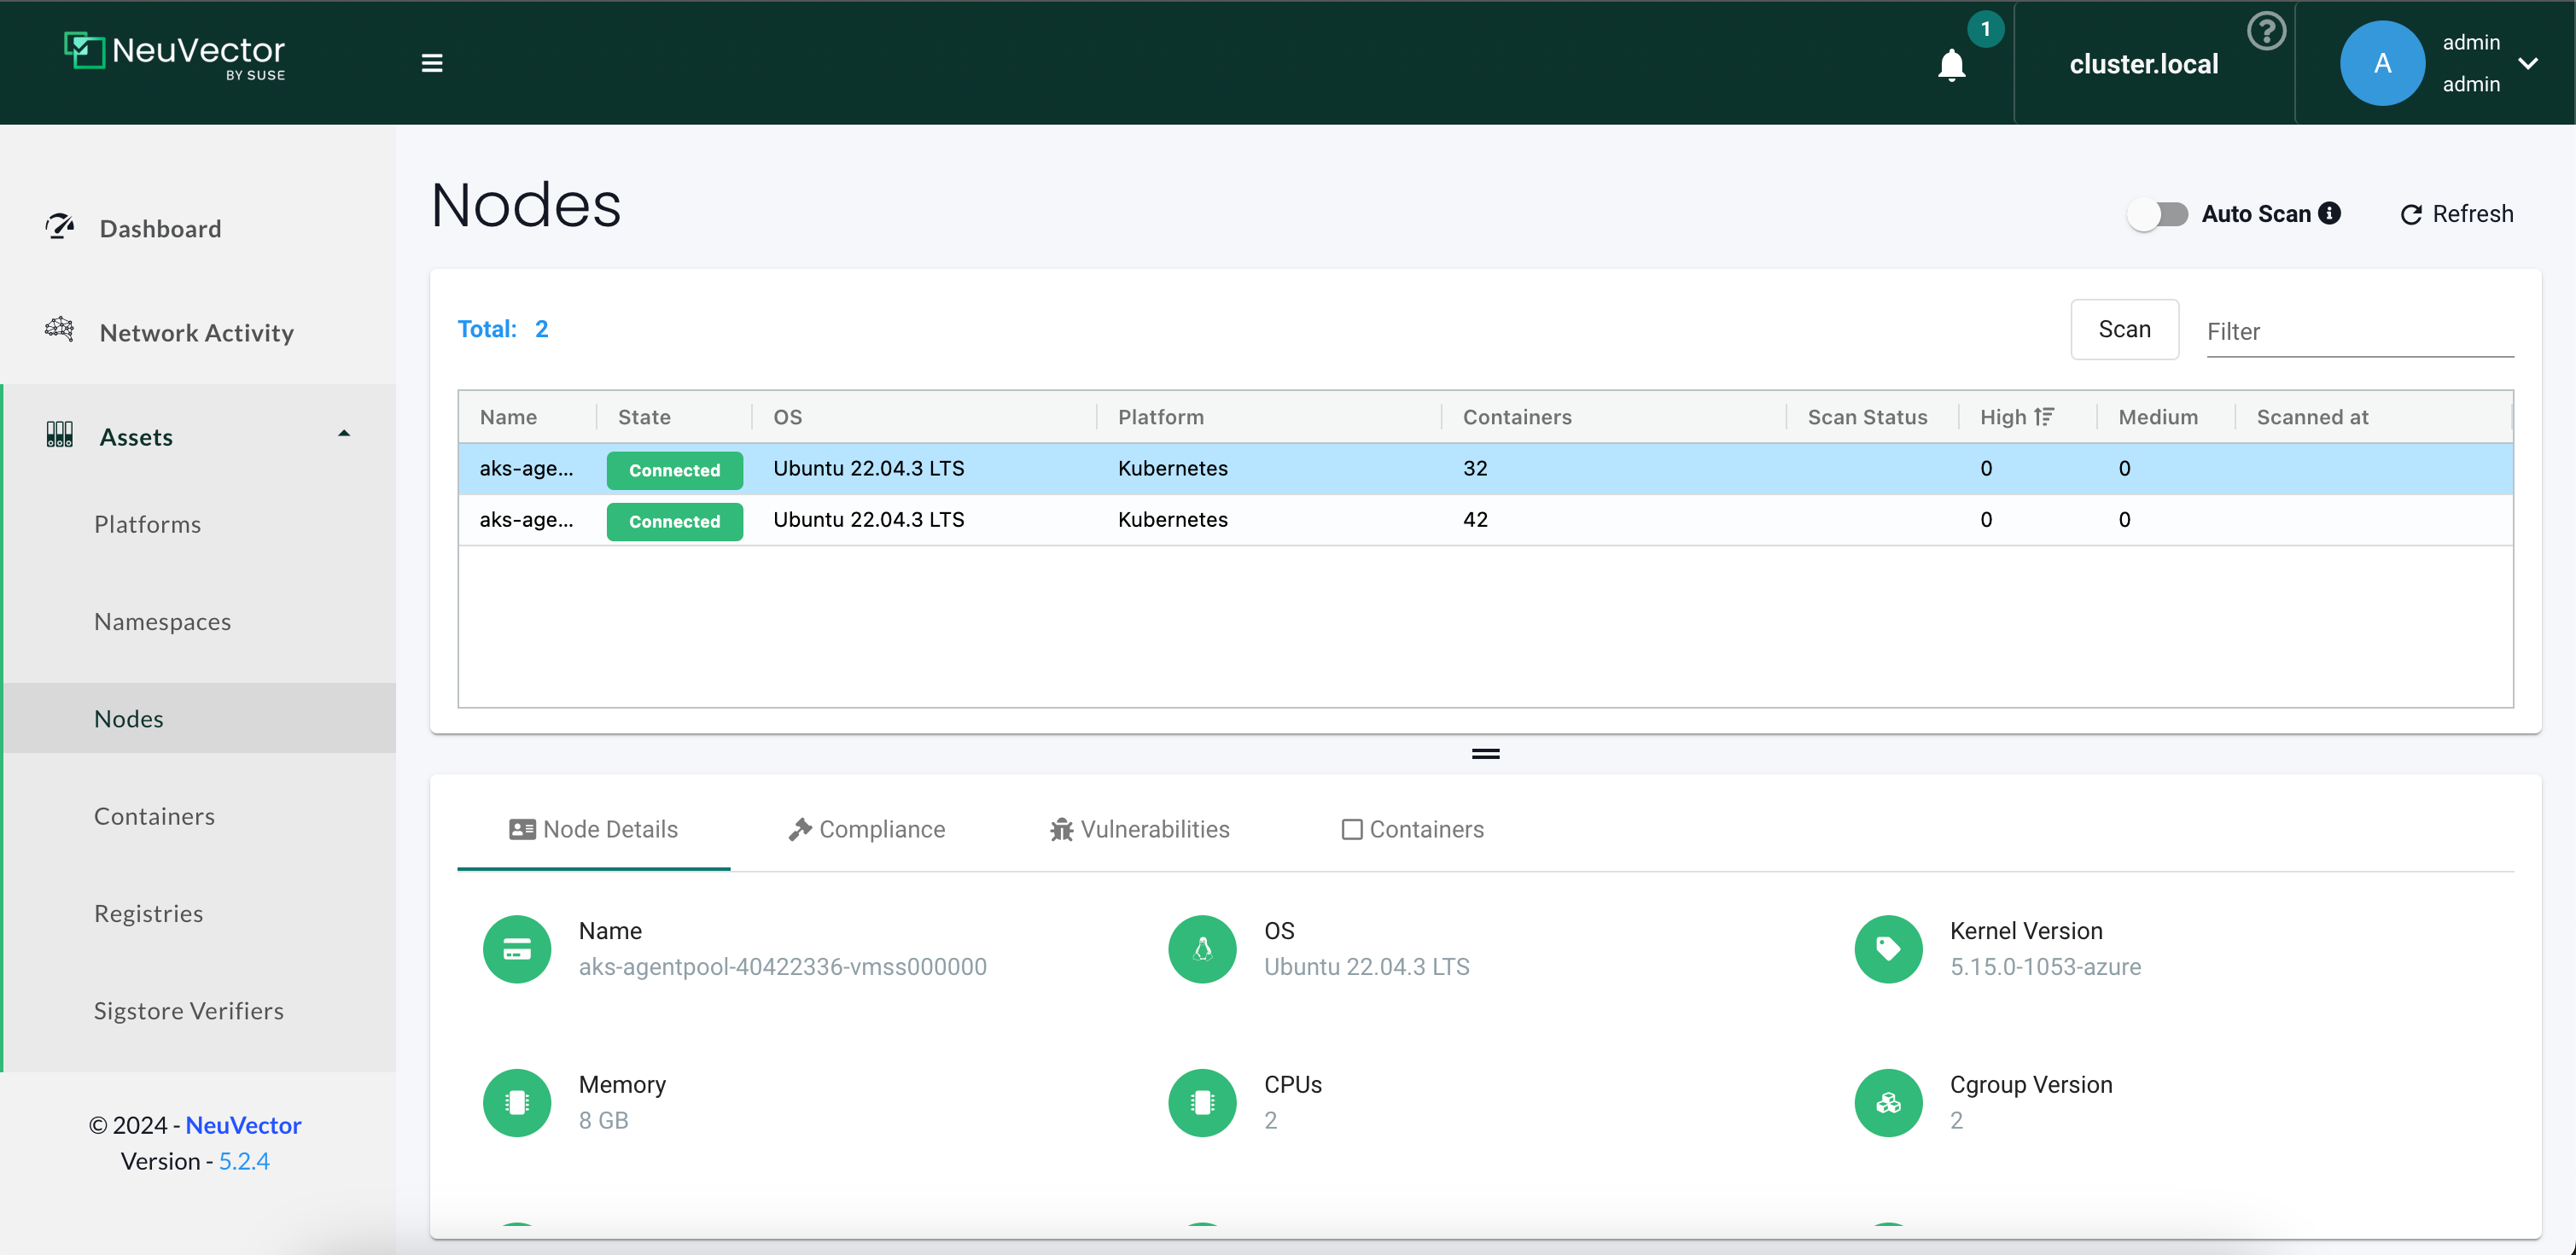
The UI springs to life from the neuvector-manager-pod nestled within my cluster. A quick observation reveals that, by default, only one such pod is active. The UI presents a wealth of information about the cluster – the number of nodes, containers, and more. I admit this took me by surprise. While it's not uncommon to have access to such data, I hadn't anticipated it being part of a security product’s UI.
Exploring the GitHub repository for NeuVector, it’s easy to appreciate how the project is structured. Each component of NeuVector, including the manager, has its own subproject, making it simpler to understand and learn about each aspect.
The primary language used in the manager is TypeScript, a detail that poses a bit of a challenge for me. My familiarity with TypeScript is a bit rusty, remnants of my Node.js days. But it seems I’ll have to dust off those skills! Delving into the repository, I found (insert link here) that the front-end framework is Angular.
For the backend part, you can see that they are using Scala! This is why you should listen to your Java lessons at school, folks! But it’s not “simple scala”. It is also Spray and Akka…Please send help.

When interacting with a UI, I’m always curious about its data source. This interest stems from two primary concerns: data retention and scalability. Is the data sourced directly from a database, requiring long-term retention considerations, or is it ephemeral? Additionally, understanding the data source is crucial to evaluate potential scalability issues, particularly if the tool heavily relies on the Kubernetes control plane.
So, the quest was to uncover how the NeuVector UI fetches its data. My starting point was the /routes folder, where I found TypeScript components representing each page – a good start. Inspecting one of these components, say the ‘node’ one, revealed that it retrieves information from a service.

Venturing further into the service folder, the pattern continues with corresponding components. The nodes service, for example, interacts with assetsHttpService for various resources. A quick lookup led me to the API folder, home to this component. This is a classic example of separating concerns in TypeScript and Angular. Examining assets-http.service.ts, it becomes apparent that the UI fetches data from dedicated URLs defined in path.constant.ts. Now that we have an HTTP request, we can look at the backend!

Exploring the backend of NeuVector's manager within its Scala repository brought me face-to-face with Spray and Akka. These technologies were new to me, requiring some time to understand through their documentation. The decision to use such advanced system/interface frameworks in projects is a double-edged sword. They're designed for scalability and future growth, yet something must be said for simplicity's beauty and staying true to the project's current scope. Once I got a handle on the structure, navigating through it became more straightforward.
Inside the API folder, there's a class for each component that matches up with the web application's structure. These classes use Spray to define routes and are executed by Akka Actors. They all rely on a global RestClient object for making HTTP requests and fetching the necessary data. Notably, this RestClient is aimed at another key NeuVector component—the controller.

This setup confirms the manager and controller relationship, as shown in the NeuVector documentation diagrams. But beyond just confirming what's on paper, this exploration gave me insights into how one might go about adding their own components to the NeuVector dashboard.
The next logical step? Diving into the Controller component. After getting a grasp on the manager's backend, I'm curious to see how the Controller plays its part in the grand scheme of NeuVector's security orchestration and its integration within the Kubernetes ecosystem.
The Controller deep dive
The documentation provides exciting information: "The Controller manages the NeuVector Enforcer container cluster. It also provides REST APIs for the management console. While typical test deployments may have one Controller, deploying multiple Controllers in a high-availability configuration is recommended for production environments. The default setup suggests using three controllers in the Kubernetes Production deployment sample yaml."
We're already familiar with the REST API functionality from our dive into the Manager component. However, the aspect that catches my attention is how the Controller manages the Enforcers. This is a crucial puzzle piece in understanding NeuVector's architecture and its operational dynamics. It's time to delve deeper into the Controller project.
This time it is Golang. I hope it will be easier for me than diving deep into the complex Scala framework. I am keeping my fingers crossed for a smoother and more efficient process. Honestly, I am surprised and proud that you read this much!
Whenever I learn about a new Golang project, the first thing I do is take a look at the .mod file. In the controller file, you can find all the necessary clues to understand that it is the piece that will communicate with your Kubernetes control plane. From apimachinery to kubectl, we are undoubtedly at the right place.
The End…… Wait What ???
Yes, I can almost hear the surprise. Just as we're delving deeper, gearing up for more discoveries, here we are, at a sudden pause.
Here's the scoop on why we're hitting pause.
This article has been a month in the making. Of course, it hasn't been my sole focus, what with code explorations, extensive testing, and weekly work trips filling my days. Progress has stalled, not for lack of effort, but because I'm chasing a level of precision in this piece that I haven't yet achieved. I'm missing crucial pieces of the puzzle, answers I need to wrap this up neatly. I'm in talks with folks at the VP level at Suse, trying to track down the right expert who can fill in the gaps. I feel like I'm on the verge of a breakthrough.
This left me at a crossroads: should I rush to publish what I have or hold off until every detail is nailed down?
I've opted for a middle path: This will be Part One. Once I've gathered the insights I'm seeking, I'll revisit and expand on our NeuVector exploration in Part Two.
I'm looking forward to sharing more with you in the weeks ahead. Believe me, the sequel to this story is something I'm eager to write, packed with all the NeuVector knowledge I've amassed.
In the meantime, spread some kindness, stay curious, and watch for my next update!